This guide describes how the XBUS interface provides for the connection of devices to the SPC Controller.
The XBUS interface provides for the connection of Expanders to the SPC Controller and can be wired in several different configurations depending on the installation requirements.
The XBUS interface is an RS485 bus with a baud rate of 307Kb (307000) 307,8,1,N (No Flow).
FULL PERFORMANCE is only supported in LOOP and SPUR wiring configuration.
This is because you get the best signal quality due to daisy chain of isolated sections with 1 transmitter to 1 Receiver and balanced terminating resistors at each end.
The performance in STAR or MULTIDROP wiring configuration is limited due to non-optimal conditions of the RS485 bus. This is because the signal quality is reduced due to multiple transmitter and receiver connections in parallel with unbalanced terminating resistors.
The table below shows the maximum wiring distances between Controller to Expander or Expander to Expander for all recommended cable types.
| Cable Type Distance |
| CQR type standard alarm cable (7x0.2mm 24AWG) 200m |
| UTP Category: 5 (solid core) 400m |
| Belden 9829 (24AWG) 400m |
| IYSTY 2x2x0.6 (min) 400m |
Each device has four terminals, 1A, 1B, 2A, 2B, for connection to expanders or keypads via the XBUS cable.
The SPC Controller initiates a detection procedure on power up to determine the number of devices connected to the system and the topology in which they are connected.
The recommended XBUS configuration for a 4000 series panel is MANUAL Addressing and SPUR Wiring.
The recommended XBUS configuration for a 5000 or 6000 series panel is MANUAL Addressing and CLOSED LOOP Wiring.
Manual Addressing
When the XBUS is set to Manual Addressing Mode and then Reconfigured, the system detects the type of device connected, Keypads, Expanders or Door Expanders, their addresses and then adds them onto the system. Each individual type of device, Keypad, Expander or Door Expander, can be addressed 1 – 32 so if an Expander is Addressed as 1 then this is Zones 9 – 16 as the first 8 Zones are on the panel. This allows you to install the expanders anywhere on the XBUS and still have the Zone numbering you require.
If two devices of the same kind are addressed with the same ID, then both devices Flash their LEDs and Bleep and the system shows a conflict has occurred
Automatic Addressing
When the XBUS is set to Automatic Addressing Mode and then Reconfigured, the controller over-rides the rotary switches and automatically assigns unique ID’s sequentially. The Expander numbering commences at the Device nearest to the Controller and ends with the Device connected farthest from the Controller.
E.g. If six Expanders are connected in a loop configuration, then the nearest Expander on the XBUS
the connection is Expander 1 (Zones 9 -16), the second nearest Expander is 2 (Zones 17 – 24), etc. ending with the Expander wired farthest from the SPC Controller, which is Expander 6 (Zones 49 – 56).
Door & Wireless Zones move automatically, dependant on the addressing of I/O Expanders.
The I/O Expanders take the first available Zones.
The doors take the next zones and then the wireless zones are added.
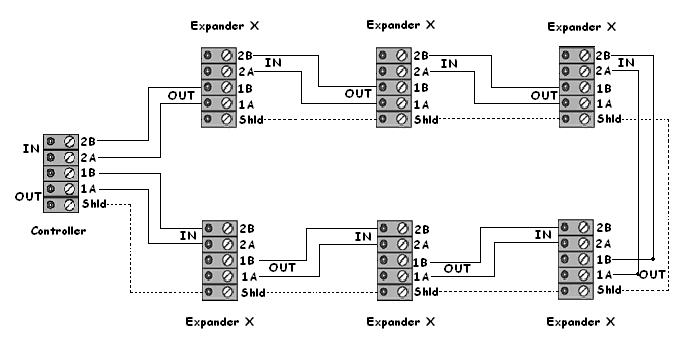
Closed Loop (Ring) Configuration
The Closed Loop or (Ring) cabling method offers the highest security by providing fault tolerant
communications on the XBUS.
This method is recommended as the wiring of choice for all installations where an SPC 5000 or 6000 series Panel is used.
All Keypads and Expanders are supervised and in case of a cable fault or break, the system continues to operate and all detectors are monitored.
This is achieved by connecting 1A, 1B on the controller to 2A, 2B on the first Keypad or Expander.
The wiring continues with connection 1A, 1B to 2A, 2B on the next Expander and so on to the last Keypad or Expander.
The last connection is 1A, 1B of the last Expander to 2A, 2B of the SPC 5000 or 6000 Controller.
See wiring configuration in below.
Closed Loop (Ring) Configuration

Termination
All Expanders and Keypads are fitted with termination jumpers, by default, allowing termination on all the devices. This is imperative for the closed loop configuration as the jumper acts as a resisting terminator cancelling echoes on the line.
Cable Shielding
The shielding terminals (SH) should only be used for cables types with shielding (e.g. Belden 9829).
If shielding is required (i.e. sites with high electric field interference) connect the cable shield to the SH terminals on the SPC Controller and all networked Expanders. As shown above.
If there is the possibility of lots of noise / Interference on site, we recommend connecting the shield to the SH terminals on the Expander and then back to the chassis earth stud ONLY so that the noise is not coming back to the panel.
Do NOT earth the SH terminal on any of the Expanders
Always check the SHIELD is not already connected to earth before connecting to the chassis earth stud or you may create a ground loop
Spur (Chain) Configuration
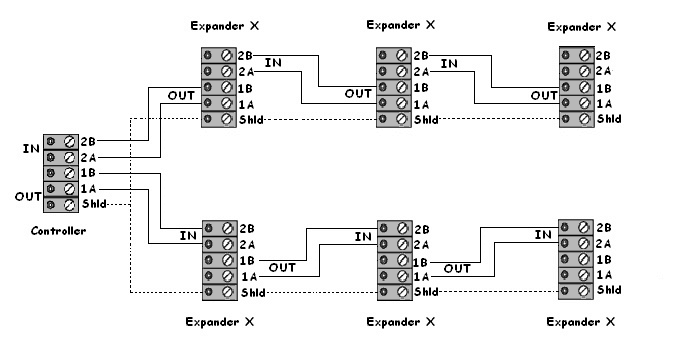
The Spur or Open loop (Chain) cabling method also offers a high level of fault tolerance and may be more convenient on certain installations.
This method is recommended as the wiring of choice for all installations where an SPC 4000 series Panel is used, as there is only a single XBUS.
The SPC 5000 and 6000 supports two open loops (XBUS).
In the case of a cable fault or break, all Expanders and detectors up to the fault continue to be supervised.
On the SPC controller, only a single port (1A/1B or 2A/2B) supports a group of Expanders. The last
Expander in an open loop configuration is not wired back to the controller and can be identified by the fast LED flashing light (one flash every 0.2 seconds approx) when in Full Engineer programming mode.
See wiring configuration in below.
Spur (Chain) Configuration

Termination
All Expanders / Keypads are fitted with termination jumpers, as default, allowing termination on all devices. This is imperative for the spur (chain) configuration, as the jumper acts as a resisting terminator cancelling echoes on the line.
Cable Shielding
The shielding terminals (SH) should only be used for cables types with shielding (e.g. Belden 9829).
If shielding is required (i.e. sites with high electric field interference) connect the cable shield to the SH terminals on the SPC Controller and all networked Expanders. As shown above.
If there is the possibility of lots of noise / Interference on site, we recommend connecting the shield to the SH terminals on the Expander and then back to the chassis earth stud ONLY so that the noise is not coming back to the panel.
Do NOT earth the SH terminal on any of the Expanders
Always check the SHIELD is not already connected to earth before connecting to the chassis earth stud or you may create a ground loop
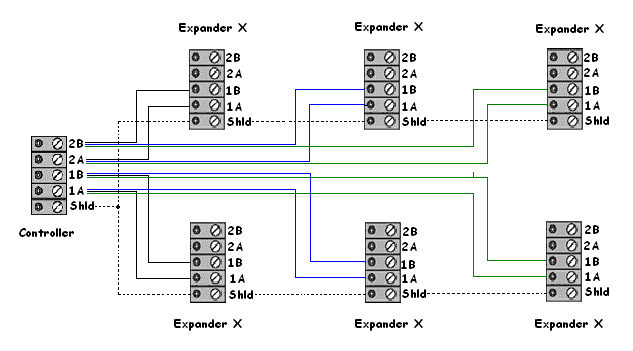
Star Configuration
The Star cabling method is most effective with systems that are pre-wired with four-core cable etc.
These configurations allow for a maximum cable length of 200 metres (100M per BUS).
A star configuration is established when multiple Expanders are wired back to the same input channel of the XBUS on the SPC Controller. On the Controller two ports exist, 1A/1B, 2A/2B, however only one channel, 1A/1B, is to be used on each Keypad or Expander.
The configuration can support 8 expanders on a 4000 series panel and 16 expanders on a 5000 or 6000 series panel (eight per BUS).
There is a maximum cable length of 100 metres per XBUS. (100M on a 4000 and 200M on a 5000 or 6000 series panel).
See wiring configuration below.
Star Configuration

Termination
When using the star wiring configuration, it is imperative that the termination jumpers be REMOVED from all devices.
A cable break on the XBUS connection results in disconnection with the single Expander on that cable.
Cable Shielding
The shielding terminals (SH) should only be used for cables types with shielding (e.g. Belden 9829).
If shielding is required (i.e. sites with high electric field interference) connect the cable shield to the SH terminals on the SPC Controller and all networked Expanders. As shown above.
If there is the possibility of lots of noise / Interference on site, we recommend connecting the shield to the SH terminals on the Expander and then back to the chassis earth stud ONLY so that the noise is not coming back to the panel.
Do NOT earth the SH terminal on any of the Expanders
Always check the SHIELD is not already connected to earth before connecting to the chassis earth stud or you may create a ground loop
Multidrop Configuration
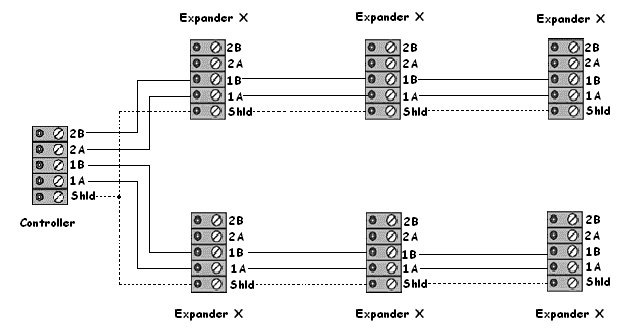
The Multidrop configuration varies in that each Expander uses the same communication channel as is wired onto the next Expander, with all Expanders using the same input channel.
On a 5000 or 6000 Controller, there are two ports, 1A/1B, 2A/2B, however only one channel, 1A/1B, is to be used on each Expander. This configuration can support a maximum of 16 expanders (eight per BUS) with a maximum cable length of 200 metres. (100M on a 4000 and 200M on a 5000 or 6000 series panel).
Each BUS cannot exceed 100M max.
A cable break in the XBUS connection will result in disconnection of every Expander after the cable break.
All other Expanders before the cable break or on a different XBUS are unaffected as they are on separate communication paths. A short in the XBUS cable renders all Expanders disabled but failed expanders do not affect the XBUS.
See wiring configuration below.
Multi-Drop Configuration

Termination
The multi-drop wiring configuration requires that, only the last Expander or Keypad connected on the longest XBUS length of cabling should remain fitted with a jumper. This jumper acts as a resisting terminator cancelling echoes on the line. Ensure that all other termination jumpers are Removed from the remaining Expanders.
Cable Shielding
The shielding terminals (SH) should only be used for cables types with shielding (e.g. Belden 9829).
If shielding is required (i.e. sites with high electric field interference) connect the cable shield to the SH terminals on the SPC Controller and all networked Expanders. As shown above.
If there is the possibility of lots of noise / Interference on site, we recommend connecting the shield to the SH terminals on the Expander and then back to the chassis earth stud ONLY so that the noise is not coming back to the panel.
Do NOT earth the SH terminal on any of the Expanders
Always check the SHIELD is not already connected to earth before connecting to the chassis earth stud or you may create a ground loop
Troubleshooting
Fault Finding using the Hardware
EXPANDER LED
Flashing Slow (once every 1.5 seconds) - X-BUS communications status is OK.
Flashing Fast (once every 0.2 seconds) - Indicates the last expander in line (excludes star & multi-drop)
LED OFF – XBUS Communications have been lost.
LOOP Wiring
If a break occurs in the LOOP, then the expanders either side of the break will flash quickly.
This is because each one has become the end of line for each bus.
All other expanders will flash every 1.5 seconds as their communication status is OK.
SPUR Wiring
If a break occurs in the SPUR, then the expander before the break will flash quickly.
This is because the Expander before the break is now the end of line for the bus.
All other expanders before the end of line expander will flash every 1.5 seconds as their communication status is OK. The expanders after the break will have no data so the LED will be OFF.
Fault Finding using the Keypad & Software
XBUS Fault / XBUS Cable Fault
To find where the fault has occurred you need to look at the live events on the keypad, go to System Status > Alerts and you will get a scrolling list of all the Alerts.
If the system is wired as a SPUR, all the kit after the break will be in this scrolling list, so from this you can tell at which point the break has occurred.
You could also compare it to the XBUS map in SPC PRO.
Test Example: -
As a test to get this to happen I pulled out the data bus wires from an expander on the XBUS.
To find out where the fault was, I went into Full Engineer then tried to Exit using the keypad and it displayed
XBUS COMMS LOST
EXPANDER 5 KSW
I had made the break between the Position 3 ID 10 (Door controller) and Position 4 ID 5 (keyswitch)
This info is also in SPC PRO in the XBUS Map.
If you’re getting the error messages 'XBUS Fault' and when you try to reconfigure 'Failed to Configure' it may be an Expander rather than the wiring. If it’s been working, try wiring out the expanders one at a time until the system works, then replace the faulty unit.
